Saturday, August 3, 2013

Knit and Crochet Pattern Chat and Creative Assist Have Become One!

Knit and Crochet Pattern Chat have combined.......Yes I have another blog called Creative Assist which I am going to combine with this one; Knit and Crochet Pattern Chat.  So soon that one will not be kept up-to-date but all help and assistance I find for knitting, crocheting, etc. will be posted on this blog. Thank you for visiting and post or comment with any problems you have and I might be able to help you or find help for you.

Happy hooking!   kathy

Here's that blog URL: Creative Assist

and here's a sample:

Crochet Help The Magic Ring

Do you need help learning the magic ring for crochet?

I found this excellent website and I'm sure there's others. 

Planet June  She has an great picture tutorial.  I always think I know how to do it but then find myself referring back to her website for help.
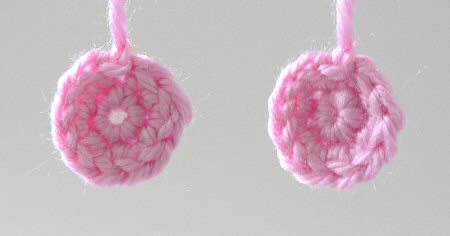
magic ring vs traditional methodNO HOLE!

Let her know I have sent you her way.  Us bloggers and website owners love hearing from the people that are enjoying our posts.  Don't be shy........please comment.  You can even tell me what help you would like to see.

Happy hooking!

Kathy

Tuesday, June 11, 2013

Crochet Turning Chain Alternatives

Crochet Turning Chain Alternatives

Mr. Miccawbar's Recipe for Happiness blog!!  

This is what Mr. Miccawber has to say.  This 
is just an excerpt..........please check out 
the blog for the rest of the information.  
You won't be sorry.  This is awesome 
and so is the blog!  Please, leave a 
comment for me if you wish to see 
more crochet helps........I'll be adding 
more knitting helps also.  So let me know; 
knit or crochet or both!  But please comment 
so I know if this blog is helpful.


"Crochet Turning Chain Alternatives

Ch 3 (counts as first dc), turn.

These are some of the most familiar words 

in the crocheter's language. They signal 
the end of one double crochet row and the 
start of another. That chain 3 works to get 
your yarn up to the proper height for the 
next stitch. It's also (in my opinion) a fiendish 
ploy designed to drive the stitcher crazy.

You know what I mean - you've been there 

yourself. You're zipping along, you and your 
hook, dancing through the yarn and 
crocheting like the dickens, when all of a 
sudden you reach the end of the row.
 Screech! The happy momentum comes 
to a crashing halt as you poke around in 
the turning chain, looking for the right place 
to put your last stitch"...............

Free Chair Pocket Pattern is Finally Here


Ok, so here's the pattern as promised.  If you crochet, you know how to make adjustments for your chair arm.  Make sure you measure. 

Chair Pocket

Cotton yarn
G hook
Gauge isn't that important

Chain 40

Round 1, SC in 2ndh chain from hook and each chain to end, SC 3 in end chain and do not turn but continue crocheting around the other side of the 40 chains adding 2 in the end stitch.

Rounds 2 and 3, repeat round 1 so you have 3 rounds with increases on each end.

Round 4, SC in each stitch around with NO increases for about 3 rows, or desired number of rows to make a more solid bottom.

Round 6, if you want, change to a DC around each row for about 17 or desired size of pouch.  

Because you crocheted around, the stitches/rows tend to twist so begin next row by slip stitch to the corner so the flap goes straight up the side.  About 4 sts.


Now crochet in rows going back and forth to the desired length so that it fits around the arm of your chair.  I am using mine on a passenger seat in the motor home so they are quite thick and big.  I did 35 rows and then:

If you want a contrasting color, I had to because I ran out of the orange, attach it at the top in corner going down the side of the flap till you get to the pouch, sc across the top of the pouch and back up the other side of the flap.  End off.

Try the pouch on the arm and determine where the buttons should go.  I used 3 but 4 might be better depending on the width of your pouch.  Sew on buttons and use the spaces between the DC as button holes.  Waalaa!  Chair pouch!

I would love to see your finished project if you could send me a picture I'll post it.  kma2053@gmail.com  Thank you and comment, too, so I know if you like to see more free patterns.

Don't miss the filet crochet patterns I have for sale, too.

Thanks for visiting and happy crocheting!

Kathy

Thursday, August 1, 2013

FREE Crochet Pattern in the Writing Stage

I am working on my version of the chair pocket pattern.  It's just a different stitch and being my chair arm is so different, there needed to be some revisions.

I must apologize that my chair pocket is weird........I ran out of the orange cotton yarn and finished with another color but, hey!, hit's for me and I really didn't care.

I'll come back tomorrow and post the pattern and a picture.

Happy crocheting!

Kathy

Wednesday, July 3, 2013

Free Pattern Coming! Crochet Chair Pocket

I was shown a pattern on FreePatterns.com.  It's called a chair pouch and crocheted with a different stitch than usual (a ds stitch which is a double stitch) and with nylon.  Great idea. 

I don't have any nylon to crochet with so am using cotton and I'm using a normal sc and a dc stitch.

I will be posting my pattern as soon as I can.  That pattern is also free so check it out, too.  I'm not saying mine is better, I like them both.

This pattern was drawn to my attention by a sweet lady on a crocheting yahoo group.  Thank you so much Lisa and she has a neat website.  Please check it out, too.

http://stretchyourdollarwaukesha.wordpress.com/

Happy crocheting!
Kathy

Tuesday, June 25, 2013

Baby Patterns - Filet Crochet


Filet crochet is another one of the things I love to design. These are just a few I'll be posting today that ARE FOR SALE. The patterns are generated by me using a filet crochet program created by Sandcastle Designs, Inc. so if you have any questions, you can contact them for help. 

I am selling them for $1.00 each or the set of 12 for $6.95 plus shipping if shipped.

Pattern Set 44: Baby Gifts and Necessities This set is just for Baby. Matching bibs, blankets, burp towels and lace. They come in sweet little bows, pretty geometric diamonds and lovable hearts. The lace and blankets were designed with repeatable patterns so you can decide how big to make them. Let your imagination run wild. Make pillow trim, curtains, bed linens, shelve trim, pillow covers, throws and table runners. Just repeat and go. By K. Anderson designs.

Diamond Afghan
Matching Diamond Bib
      
Matching Diamond Lace
Matching Diamond Burp Cloth

Heart Afghan
Matching Heart Lace
 
Matching Heart Bib

Matching Heart Burb Cloth

Bow Afghan
Matching Bow Lace
Matching Bow Bib
Bunny Afghan


Baby Bib Patterns:
Finished Sizes: Thread size 5: 15.8 inches x 22.8 inches, Thread size 10: 13.1 inches x 18.0 inches, Thread size 20: 12.5 inches x 17.3 inches, Thread size 30: 12.0 inches x 16.6 inches

Baby Lace Patterns:Finished Sizes Thread size 5: 5.5 inches x as long as you desire as it's worked from the end.

Baby Burp Towel Patterns:
Finished Sizes Thread size 5: 12.7 inches x 23.1 inches, Thread size 10: 10.6 inches x 18.2 inches, Thread size 20: 10.1 inches x 17.5 inches, Thread size 30: 9.7 inches x 16.8 inches

Baby Blankets/Afghans:Finished Size depends on yarn type and your personal gauge. Patterns are created for adjustments.

The pattern instructions are given for 7 different types of threads/yarns; from size 5 crochet thread all the way up to worsted weight using an I hook. Very versitile patterns. Cottons are the best for the bibs and burp towels for maximum absorbancy.


Patterns can be printed and mailed to you snailmail or I can attach them to an email. Add $1.50 for printing and regular mail shipping OR it can be shipped priority.  Priority prices will be in effect.


I prefer PayPal payments. PayPal ID: kma2053@gmail.com


home contact info


Copyright © 2007 knitandcrochetpatternchat - an online creative place All rights reserved


Monday, June 10, 2013

Color of Summer Week 1

Week one of the Color of Summer challenge has begun!  Want to join?  Go to my last post and click on the link.

Here's my first submission for this challenge.


I did this painting with spray inks, acrylics, markers, pens and Portfolios

The colors this week were Citron and turquoise.

Tell me what you think.  Please, leave a comment and let me know you've been here whether or not you like my painting.  Please and thank you.

Kathy

Monday, June 3, 2013

Color of Summer

Please check out and sign up for the Color of Summer!!

Excerpt taken from her website and I hope you will join us!


"Hellooooo and thank you for the rockin' introduction to our first interactive affair, The Summer of Color 3: Artist's Choice! Wether you're new to the event or you've been waiting a year to begin again, I promise that this will be one to remember. So get ready for six weeks of luscious color prompts, weekly linking opportunities, beautiful giveaways, creative inspirations and an amazingly supportive community that You, the Artist, help to produce. 

What's that you say?
That's right. This year, the SOC is taking a decidedly different turn. This year, You will help determine the colors we'll be playing with by voting for your favorites on a weekly basis.

How will that work?
Easy. Each week, you'll have the chance to vote for one of 12 different color combinations by taking a poll at the end of each post. Simply pick your favorite and, in majority rules fashion, the highest rated one wins. Come back the following Monday to see the results and get started. As always, you'll work in your preferred mediums - creating anything your little heart desires - with color being the only stipulation."..............................


I, personally, am joining and can't wait to begin.  Spread the word and come join us!!


Monday, May 20, 2013

Quick Post about Knit and Crochet Pattern Chat Blog

AND it's future.  Knitting and crocheting isn't the only things that I do.  I've been sitting here thinking about what this blog means to me and what I really want it to be for you.

I have so many likes, dislikes, interests and real loves of so many different crafts and so many people don't understand how I can do so much and do it well.  It's not all that bad to do so much.  I was always told to stick to one thing and learn it well but I am not the type of person that can do that.  Nope, not me.


I find nothing wrong with loving to do more than one thing, hobby, or interest at one time.  Afterall, many women love their husband, their children, love to sew and cook........hey, that's more than one thing.  I've done a real close look at my loves..........


I started out with fiber arts, that a more professional way of saying knitting and crocheting.  My Mother was making a knitted afghan out of square blocks of knitted yarn in dark colors.  I remember purple and blues for sure.  I helped her knit them at the age of 10.  Lots of us started knitting and crocheting at a very young age. Many say, "I've been knitting all my life!"  And many many have been, just as I feel I have been.  I would love to hear from all of you who would like to share what age you were when you learned to knit or crochet.  Did your mother teach you?  Your grandmother?  Let me know in the comments.  


Do you want to know my likes in crafting, needlework, etc?


I started with knitting as I stated above.  I knew I loved art and did lots of drawing and painting as a child.  I remember using bottle caps, erasers, toys and drew geometric patterns coloring in all the areas with bright colors.  We only had crayons at that time.


We, my sister and I, as we got older would draw rooms or just one corner of a room and worked so hard at getting the perspective correct.  Of course, we didn't know it was perspective.......it was just the corners.  Art was my favorite subject in school.


Then I learned to sew in school; middle school and high school, as part of Home Ec. I always took on the hardest patterns I could find.  I once tried to make a plaid men's sport coat!  At age 15!  I didn't know how to match plaid and a sport jacket?!  What was I thinking!  My poor Mother just shook her head and said she couldn't help but I did finally get it done.  Amazing!


Then after I got married and became a stay at home Mom, I learned how to crochet and embroider and kept going with my painting.......this time pictures not geometric patterns.  I tried oils but didn't like the smell nor how long it took to dry.  I continued sewing and made all my own clothes and those of the kids. I used to create my own patterns by taking parts of one and combining it with another.   I also have always cut our hair.......even my husband's and I still do to this day.  The kids take care of their own now that they are in their 30s and 40s, but I still cut my own.


I really got into crafts when most everyone did.  Remember the big craft surge, craft sales, and shows?  Was that in the 90's.........early 90's, I think.  I made it my full time job while the kids were off to school everyday.  I had my own band saw and sander.  I designed and painted all my wood items to sell.  I did that for about 10 years till things just weren't selling anymore, the crowds got smaller and sales almost quit!  I was doing shows and was in about 3 consignment shops.  Remember them?


I continued to design and became a craft designer for that industry traveling about every 6 months to sell my designs.  I went to NYC, Dallas, Orlando, MPLS, Chicago, places in CA and also took the test to become a Professional Craft Designer and Professional Craft Demonstrator at the trade shows.  I worked for Plaid, Syndicate Sales, and a few others.  I loved every minute of it.


Here we are to today.  I continue to craft, knit, crochet, paint and create!  I have added crochet jewelry, beading, working with wire, I love Kumihimo, working on our family tree, acrylic painting, filet crochet design, watercolor painting, mixed media and love love love paper........I make albums, journals and paper beads.  I can't wait to add, polymer clay bead making and calligraphy.  Oh there's so much to do and so little time.  Have you heard of Viking knitting with wire!!??


I will be showing you all the things I've created.  It's going to take some time but I hope to be able to go back and show you what I have done.  If you've followed this blog or have gone into the archives, you can see some of the stuff or you can go to artsandcraftsdotcom.blogspot.com to see even more.


I have tons of filet crochet patterns I can share and some I can sell you, I have lots of jewelry to share, my crocheting, painting, on and on.  So stay tuned.........


Don't forget to tell my about your knitting and crocheting beginnings.  I'd love to hear from you!


Keep creating!

K


Saturday, May 18, 2013

Free Crochet Pattern for a Tea Cozy


As promised, I will post a new and improved crochet pattern for my tea cozy.  I love love tea, don't you?  A hot cup of tea on a drizzly chilly rainy morning........oh, so good.

I posted a not-real-good picture of my purple one a month ago or so.  Where does time go!?  At least a month ago but I'm too lazy to go find out the exact date.  


I finally finished what I think is a tea cozy that should fit most round pot belly type tea pots.  It doesn't hurt to continue to measure as you go.  You do want it to fit?  If you do not join at the end of the rounds, make sure you use a marker.


I made two cozies and put one inside the other.  I also made the inside one a bit longer with a different colored edge so it showed beneath the upper one. Please read through instructions first and test your hook and yarn for the gauge.


Here we go:


Crochet hook size H

cotton yarn such as Sugar and Cream
I used one really large skein of Bernat bought at JoAnns, must have been a pound or two.  I don't have the label anymore
GAUGE:  8 STS TO 1" AND 5 ROWS TO 1"


1.  Chain 2, 8sc in 2nd chain from hook, join


2.  2 sc in each sc around, join  (16 sts)


3.  1 sc in first sc, (2 sc in next sc, 1 sc in next sc continue around in this manner) (24 sts)


4.  2 sc in first sc, (2 sc, 2 sc in next stitch, continue around in this manner) (32 sts)


5.  2 sc in first sc, (3 sc in next stitch, continue around in this manner)  (40 sts)


6.  2 sc in first sc, (4 sc, 2 sc in next stitch, continue around in this manner) (50 sts)


7. sc around one row


8.  2 sc in first sc, (5 sc, 2 sc in next stitch, continue around in this manner) (60 sts)


9.  sc around one row


10.  2 sc in first sc, (6 sc , 2sc in next stitch continue around in this manner) (70 sts)


11.  sc around one row


12.  2 sc in first sc, (7 sc, 2 sc in next stitch continue around in this manner) ( 80 sts)


13.  sc around one row


14.  2 sc in first sc, (8 sc, 2 sc in next stitch continue around in this manner) ( 90 sts)


15. and 16.  sc around


17.  2 sc in first sc, (9 sc in next stitch continue around in this manner) (100 sts)


18.  Now the tea cozy will begin cupping, or it should (LOL not funny I know) so continue with as many sc rows you need to make the cozy the length you want minus about 1".


When you reach this point:


1.  DC in each sc around, join if you are doing so or just keep going around.  Make sure you have the beginning marked.  


2.  Dc around dc from previous row from front to back making a post, dc around dc of previous row from back to front making a post and continue around.


3. Repeat rows one and two till the desired length.


4.  Sc around to finish


5.  Crochet a loop and attach it to the top


NOTES

I made mine double thickness so made another one and slipped it over the top of the first one.  They fit snugly.   The top one can be shorter than the underneath one or can be the same length.

If it isn't cupping or might be too big for your tea pot, you can decrease evenly about 5 stitches every few rows so you need to think ahead.


I sometimes change colors during this section of the process to make stripes.  You can join at the end of every row or not.  That's up to you but it does make for a neater finish if you plan on changing colors.

If you find any errors, please let me know........I wrote this as I worked so it should be correct.


Happy crocheting!


Tuesday, April 9, 2013

Crochet Tea Cozy is Still in the Works


Crochet Tea Cozy  ~~  I am almost done with the crochet tea cozy pattern.  Turning out really cute, too.  This one is for my sister as a surprise gift.  So shhhhhhh

I will post a photo as soon as I am done and will share the FREE pattern with you.

In the meantime, don't forget all the help you can get from my other blog.

Creative Assist.

I'm adding new help almost everyday.

Traveling crochet Kathy


Monday, April 8, 2013

Crochet Designer Blog


While you're waiting for my revision on the crochet tea cozy, I will tell you about this website, Crochet Designer Blog.  Called also, a Stitch Story. Day 1.  Very interesting reading and a fun site to visit.

I especially like her idea to......well here is what she had to say about discovering a pretty technique:

"I decided that my special post to kick off National Crochet Month, should be about a new technique I have been experimenting with. Actually my daughter gave me the idea, when she asked if she could use some of my swatches for an art project. She said they weren't the right color, and she needed to paint them to match her color scheme. She used acrylic paint, so when the pieces were dry, they were rigid, but she was pleased with the results. I loved the idea of being able to place color exactly where I want it, after a piece has been crocheted. A neat alternative to changing colors in yarn, and having multiple ends to weave in!"

What a beautiful idea, huh?


Please check out her blog and see her designs.  Her name is Shelby Allaho and a very talented lady.  She has many designs published in magazines and has patterns for sale on her website.

Here's another link to see her work.  Crochet Designer Blog.  I love her style and her work.  I love her cowl patterns, too. 

Please take a look.  She's awesome!


Here's how it looked when she was finished.......I love it and don't know why I didn't think of this.


Sunday, April 7, 2013

Crochet Pattern for Tea Cozy


The crochet pattern for the tea cozy has some problems.  I am so glad I tried it myself.  Don't know what I was doing that day but I didn't like the way it turned out so I am going to re-write the pattern and re-post it.

So don't despair, I'll be back in a day or so because I am working on it right now.  I love this tea cozy so much, I shared the pattern and I cannot let it go without fixing it.

They make wonderful gifts and I was thinking that the word T E A could be applied with felt letter, embroidered, painted or whatever you can come up with.  How cute, huh?

I will post a picture of the new one, but hopefully, it'll come out like the purple one or way more like it than the pattern I posted.

Be patient!  And come back.

Saturday, April 6, 2013

Crochet.........Let's Crochet Together


Crochet Tea Cozy time!


OK, so no one is with me yet on the crochet challenge.  I am starting right now anyway.

I am using yellow cotton and here's the pattern again.

Tea Cozy.  Remember it's FREE!


Friday, April 5, 2013

Crochet.....Let's Crochet Together

I REALLY feel like a crochet project right now.  I've messed around enough!  It's time to crochet!  Who's with me?

We could do a project together, or at the same time, and I'll post our progress and our finished projects.

I think I am going to make this what I posted a few weeks ago.  My tea cozy!  Tea Cozy Pattern

Who's with me?

Saturday, March 23, 2013

AFter a little more work..........Still have far to go.  You can see where I got carried away with the decoupage medium but then I didn't know I was going to try painting them.  So I'll work on them more tomorrow.

Another Creative Endeavor Attempt

Hi,Here's what I'm working on now for the fun of it.  Living in an RV full time is quite a challenge when it comes to hobbies.  There's never enough room.  So I cannot buy and stash away anymore, not even paint.  So while working on my paper rolled beads and seeing all the beautiful colors, I thought that maybe tearing up the paper and using pieces could be a way to create some art.I decided to start with something I thought I knew and would be easy to shade.  Apples!  Red ones!Here's the beginning.  I drew out the apples and got the background startedon a piece of watercolor paper and drew the apples.  Then went through magazines for the colors I wanted.  I wasn't quite happy with it so decided to work on the apples with my watercolor pencils.  Maybe that would make me like it more.

After a little bit of work, I decided it's worth keeping going.  We'll see what more damage I can do tomorrow.  I'll post another picture of my accomplishment.  Or lack there of!  LOLCheck out my Ebay listings:  Crochet Jewelry  


Tuesday, March 12, 2013

Nothing Crochet About THis

Here's my latest adventure..........Magazine and ad flyer rolled paper beads!  I love recycling and this helps but there's no way I could ever use the amount of advertising flyers that we receive.  Or magazines!  But I'm giving it a good try. 


 Who would have thought you could make such beautiful beads.  I have been using clear fingernail polish to seal them with but I have to find something not so toxic!  Smells really strong and when you have so many beads to seal, it gets a bit overwhelming.

You see the rolled paper in the bottom left corner.  Those are not beads but will use them some how.  THey're fun to make, too.

Here's another one of my favorite things to do:  albums and/or journals.  This one is one of my favorites:


Love this album.  The cover looks like leather.  Love the way it turned out. 

Kathy


Sunday, March 10, 2013

Oh my!!  You do not want to miss this website!!  Hundreds of free patterns.  Hey, please don't leave me for the other website!  I'll miss you but I do love to share and maybe you can find what you're looking for there.  

Please come back!  LOL  Here's the link     Free Crochet Patterns - By Indie Crochet Designers 


Check it out and please come back!  LOL

Creative Assist Blog

Don't forget my other blogs, especially the Creative Assist Blog I've created with lots of creative help, no tutorials but lots of other helps.  Click on the above link.

I'll be adding more and more so stay tuned and keep coming back.

Thank you,
Kathy

Crochet Pattern Bonanza !

Yup, Crochet Pattern Bonanza is a wonderful website where you can get some free crochet patterns so please, check them out!  Lots of baby patterns, doll and little girl patterns, fun things for kids to play with and enjoy.  There's also tutes and patterns for your home. Look for the animals, jewelry and wearable.

Fun things there.  Crochet Pattern Bonanaz

What I've been doing lately is reading, playing games and practicing routines for my Zumba fitness class.  What I've done creatively is continue to work on my kumi braiding making jewelry and just long braids.

I have two albums started; the ones you do from scratch and you can find hundreds of patterns on youtube on how to create these albums from chipboard to envelopes.  Fun stuff.

No pics right now but will work on that and will be posting a new pattern soon.


Thursday, February 28, 2013

Kumihimo Weaving

Have you heard of Kumihimo weaving?  Definitely, you should Google it.  These are a few of the bracelets I made; one finished and the other two not so much.

It's adicting!  You'll love it.  I found my disc at WalMart in the kids craft section and it was only $1.97.

Amazing, isn't it?  Wonderful, huh?  I didn't really need another hobby but this was too much fun to not try it.


I hope you try it and will send me photos of your creations.

Kathy

Wednesday, February 20, 2013

FREE Crochet Pattern for a Tea Cozy

Just a little update!  This pattern is way off so don't try it till I rewrite it.  Which I am doing right now.  I will take this down when I'm done.

As promised, here's my pattern for my wonderful beautiful purple cotton crocheted tea cozy.  Can you tell I love it?  It works beautifully!  My tea stays hot for a long time, at least till I drink it all.  I love the deep purple color of the cotton yarn, too.

I have not tested this pattern so if you find anything wrong, or you question anything, let me know.  This is not rocket science so if you miss a stitch or don't have the exact number I came up with, it's no big deal.  Just make sure it fits your tea pot!


The yarn I used was a huge skein of cotton I bought at JoAnns Craft Store.  Might have been their brand but I cannot say for sure as the label was gone.  It is 100% cotton and I'm sure Sugar and Cream or any of the cottons would work.  I suppose a worsted weight yarn like Red Heart SuperSaver would work, too.  I did make two, as you can see in the photo, making one longer than the other and then added a crocheted loop at the top.  I felt if one layer would work, two would be better. 

If you know how to do tapestry crochet, using two colors, that would be fun, too.  I just didn't want to take the time to work out a pattern.  I'm always in a hurry.  I'm retired you know!  LOL


Have fun and hope you enjoy it.


I started with a chain 5  MARK THE BEGINNING ROUND WITH A CONTRASTING COLOR YARN

sc in 2nd chain from hook

sc in next 3, 3 sc in last stitch, and sc in other side of chain in each chain, then 3 sc in end sc.

Continue the increase one row around to eliminate cupping too soon.

1.   2 sc in each side stitch and 3 sc on each end stitch, end with 3 sc in end stitch so you have about 36 stitches

2.   3 sc in 1st stitch, 1 sc to end and then 3 sc in the end stitch. Increasing only on the ends.

3.  3 sc in 1st st, 2 sc in next stittch and then 1 sc in each stitch until you reach the stitch before the end stitch then 2 sc, 3 sc in end stitch, and then 2 sc in next stitch and 1 sc in ea stitch till the other end and join in the top of the first sc of round.

4.  3 sc in 1st st, 1 sc in ea st to end, 3 sc in end st  there is no joining.

5. Repeat last row

6.  2 sc in first 3 sts, 1 sc in ea st to last 3 sts, then 2 sc in the 3 end sts

7.  repeat last row

8.  1 sc in ea st around increasing 2 sts ea side evenly (4 increases)

9.  Increase this round 4 times on each side and 1 increase on each end

10.  Repeat round 9

11.  1 sc each st around

12.  Repeat round 9 EXCEPT make the 4 increases each side towards the ends.  So that means round the end, increase 2 times within a few stitches, stitch around the end and within a few stitches again increase 2 times and then 1 sc to the other end.

13.  Repeat round 11~ 10 rounds or 10 times.  Make sure you have marked the beginning of your rounds

14.  DC around making sure you have an even number of stitches.  no need to join

15.  DC around from front to back of post the dc made in the last row.  DC around from back to front of the post the dc made in the last row.  Repeat around the front, around the back, around the front, etc. around.

If when you get to the end and you've got two posts, just use them both.

I did round 15, 6 times and the finished with a sc round and dec 10 stitches evenly around one more sc row.

I made two, one a little longer than the first or you can make them both the same.  Make sure you measure your teapot or at least try it on to measure the length several times before you end with the two sc rows.

~~~~~~~~~~~~~~~~~~~*~~~~*~~~~~~~~~~~~~~~~~~~~~

I had fun making this pattern but not writing it down.  I'm not good at that but I give it my all and hope for the best.

I've got another blog called Creative Assist and I might combine that one with this one.  I have lots of knitting and crocheting helps, techniques and ideas posted there and have lots more to add.